A simple guide to build a personal website that will make your techy friends proud.
This is the second article in a four-part series, so if you jumping here go ahead and take look at the introduction in part 1.Part 2: Building your Server
Ok, this is the part that may scare away those who aren’t deeply technical, but I promise, this will be easier than you think, and you’ll be able to brag to your techy friends when you are done. Technical terms for this section Virtual Server and Droplet: We will be standing up a preconfigured virtual server, known as a droplet. Virtual Server- Let’s explain this one in two pieces.A Server is just a computer that is made to do things like host websites. The term Server is more about how a computer is used than about what the computer is. You can imagine this as the difference between a car and a taxi. The term taxi, like the term server, tells us what the car does. Most people think about taxis as yellow sedans, but taxis can be any model or color. Servers are the same way. Lots of Servers are big computers that slide into racks, but any computer providing other computers with content or services, like web pages and access to printers, are also servers. What is important here is to know that you are getting a computer with the ability to be a server.
In this context, Virtual means that the computer we’re using is not a physical device by itself. It is built inside a much larger environment. This gets a bit tricky to explain, but I will try. You can think about a virtual server as one apartment in a highrise. While you’re inside the apartment, all you know is that you have is 1000sqft of space. Even though the highrise is very large, everything you need to live is within your space. Your Virtual server is the same way. Even though a physical computer that may be huge with lots of power and memory, you rent a small self-contained spaced with everything you need. One huge benefit of virtual servers is they can upgrade at a moment’s notice. If you realize you need more space, just knock down a wall in the high rise, and all the sudden your apartment is 2000sqft.
Droplet– A droplet is what Digital Ocean calls their preconfigured virtual servers. Going back to the highrise example, you can think of these as fully furnished apartments that are already customized to meet your needs. What that means: You will be paying a monthly fee for a company (I used DigitalOcean) to keep your server up and running. DigitalOcean will be providing your server, which is just a computer running somewhere else, that already has the tools needed to make a website installed and ready to go. The server is virtual, which means that you can control how powerful it is with the click of a button. A basic web server, like the one we are creating, does not need to be very powerful at all. More technical stuff: We will be building a LAMP (Linux, Apache, MySQL, PHP) Server that has WordPress pre-installed. What that means for you: You will not need to pay for any licensing fees or maintenance fees, as all the services provided are open-source. You will also have WorkPress, user-friendly website building tool, up and running minutes after you get this process started. WordPress is one of the most common and most popular website building applications available. WordPress can be managed and operated from your web browser so, in all likely hood, you will not need to log into the server after the initial process is completed. There are thousands of free and paid add-ons for WordPress. With an intuitive user interface, a wealth of online tutorials, and many professionals ready to assist or take over the design process upon request, WordPress is a great base for our website. For the techs: Like all things in this process, if you prefer to use a different hosting provider, server design, or web-content application, go for it! Personally, I prefer CentOS to Ubuntu and PostgreSQL to MySQL, but I picked this build to take full advantage of the simplified setup and admin processes that this preconfigured droplet provides.Getting into the weeds
I am going to walk you through the exact steps needed to get your droplet set up. As a note, keep in mind that this article was written in October of 2020, and it is very possible that some details may have changed. Even with updates, you should be able to make good choices based on these instructions. If you prefer instructions, without the explanations here (TLDR Version), just jump down to the Step-by-Step at the bottom of this article.- Navigate DigitalOcean.com
Who is DigitalOcean? DigitalOcean is a competitor to companies like AmazonAWS, Godaddy, Microsoft Azure, and others. I use DigitalOcean for all my personal servers because they are simple, well priced, and extremely flexible.
- Create an account
If you already have an account, you can bypass this step. The account creation will ask you to enter payment information. Do not be alarmed, this is normal. The plan I recommend is about $5.00 per month, and we will get there in just a moment.
- Create A Droplet
A Droplet is what Digital ocean calls their preconfigured servers. To start the setup process, click Create a Droplet on the dashboard. Note this change may change over time, but it is safe to say the Create a droplet option should stand out.
- Pick the right Droplet
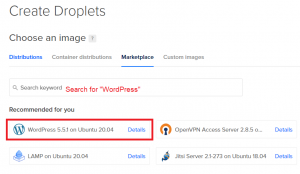
The first page in the creation process will ask what you would like your Droplet to be. We will be using a custom-built droplet from their Marketplace. At the time of this article’s creation, that droplet is called WordPress 5.5.1 on Ubuntu 20.04. Typing WordPress into the marketplace’s search bar should pull up your options.
- Pick your Price Plan
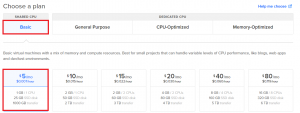
I would set up your page with the smallest price plan list, currently $5/Month. If you are planning on storing large media files such as videos, images, or music on your website or you anticipate a very large volume of traffic to your page, then you may need something larger. Just like most of what we’re doing, here, it’s ok to guess. DigitalOcean will notify you if you are approaching a limit, and it is very easy to give yourself more breathing room later.
- Pick your datacenter
It’s wise to pick the data center closest to your location or the location of your target audience. There no price difference here, it is simply a matter of proximity. Servers that are farther away from you take a little longer to load. I Live in the United States so I picked a New York Server. If I moved to the West Coast, I would probably switch to the San Francisco Datacenter.
- The rest of the configuration Page
- Additional options- None are needed, but if you like to keep an eye on things, monitoring won’t hurt.
- Password- This is your system password, make it a really good one, and make sure you save it! It is highly recommended that you use something complex like the passwords created by this website https://www.lastpass.com/password-generator
- HostName- Only you will see this but feel free to name your server something that makes sense, like PersonalWebsite, WordPress, or ICantBelieveImDoingThisOnMyOwn.
- Backups- This one up to you. Having backups reduces the risk of you having to start over should something catastrophic happen but costs 20% of your droplet fee. I said yes because frankly, I would rather be safe than sorry when it comes to this much time and energy.
- Click Create Droplet
Dance! Do a little jig in your chair or run to get a fresh cup of coffee. It takes about three minutes for your server bake.
- Done! You are not finished creating your server! I told you that wouldn’t be painful. Now on to configuring it.
Step-by-Step Instructions:
- Navigate to DigitalOcean.com
- Create an Account
- Click New>Droplet
- Search the Market place for WordPress, pick the Ubuntu-based WordPress droplet
- Pick the $5 plan and a data center near you
- Pick any add-ons you want (Optional)
- Make a really secure password (And don’t forget what it is!!!!)
- Click Create
- All done! Now you’re ready to Configure your Server